

Set up CRM and webhook integrations
With a CRM or webhook integration, you can automatically forward contact details collected by your AI Agent to your CRM, email marketing tool, or any other external platform. Heyloha has built-in integrations for HubSpot and ActiveCampaign, and also supports a generic webhook for tools like Zapier, Make (Integromat), and n8n.
In this article, we walk you through the steps to set up a webhook connection from Heyloha.
What is a webhook?
A webhook is a way to automatically send data from one system to another. As soon as your AI Agent has collected the required contact details, Heyloha sends that data via an HTTP POST request to the URL you configured. The receiving system then processes the data, for example by creating a new contact in your CRM.
Supported platforms
- HubSpot: direct connection to the HubSpot Contacts API. Contact data is automatically mapped to standard HubSpot properties.
- ActiveCampaign: synchronisation via ActiveCampaign's REST API. Standard fields are filled automatically; custom field IDs are needed for address data.
- KeyVue: for customers using the KeyVue real estate CRM. Leads are directly created in KeyVue.
- Generic webhook: send contact data as JSON to any URL. Works with Zapier, Make (Integromat), n8n, and custom endpoints.
For HubSpot and ActiveCampaign, we have separate guides with step-by-step instructions. See the links at the bottom of this article.
What do you need?
- An active Heyloha account with at least one AI Agent.
- An external system that supports webhooks (for example a CRM, marketing platform, or custom application).
- The webhook URL from the receiving system, including any parameters.
You'll find webhooks under Agent, in the Integrations tab. Don't see that tab? Then you don't have admin rights for this brand. Ask the administrator of your account for access.
Setting up a webhook connection
Go to Agent, then Integrations
In the left menu, click Agent and open the Integrations tab. The Webhooks section is at the top.
Click Add webhook
In the Webhooks section, click Add webhook. A form opens where you set up the connection.
Choose your platform
Select the integration type: HubSpot, ActiveCampaign, KeyVue, or Generic. The form adapts automatically based on your selection.
Choose the channels (optional)
By default the webhook applies to every channel of your agent. To limit it to, for example, only the web chat or only WhatsApp, select the channels you want. Leave it empty and the connection applies to every channel.
Paste the webhook URL
The next step depends on your chosen platform. For KeyVue and Generic: paste the webhook URL. For HubSpot: paste your Private App Access Token. For ActiveCampaign: enter your API URL and API Key.
Name the integration
Choose a recognisable name, for example 'CRM Lead Forward' or 'Quote Request'. This name is also used as the internal function name for your AI Agent.
Select contact fields
Choose which details your AI Agent should collect and forward. You can choose from: first name, last name, email address, phone number, address, postcode, city, and country.
Describe when the connection should be used
Provide a short description of when your AI Agent should trigger this connection, for example: 'Use this connection when a visitor shows interest in a viewing and leaves their contact details.'
Save and activate
Set the connection to 'Active' and click Save in the form. The webhook is active immediately, you don't need to save anything else.
As soon as you click Save in the form, the webhook is active immediately. You don't need to save your agent separately afterwards.
Which contact details can you forward?
You decide which fields your AI Agent collects and forwards via the webhook. The available fields are:
- First name
- Last name
- Email address
- Phone number
- Address
- Postcode
- City
- Country
Select at least one field. The AI Agent asks for these details naturally during the conversation and forwards them automatically once the goal is reached.
How does it work in practice?
When a visitor is chatting with your AI Agent and provides the required details, Heyloha automatically sends a request to the configured webhook URL. The receiving system processes the contact details, so your team can follow up immediately.
- A website visitor starts a conversation with your AI Agent.
- The AI Agent recognises the goal (for example: forward lead) and asks for the required details.
- After collecting the details, Heyloha sends them to the external system via the webhook.
- The receiving system processes the details (for example: create a new contact).
- Your team gets notified and can follow up on the lead.
Managing webhooks
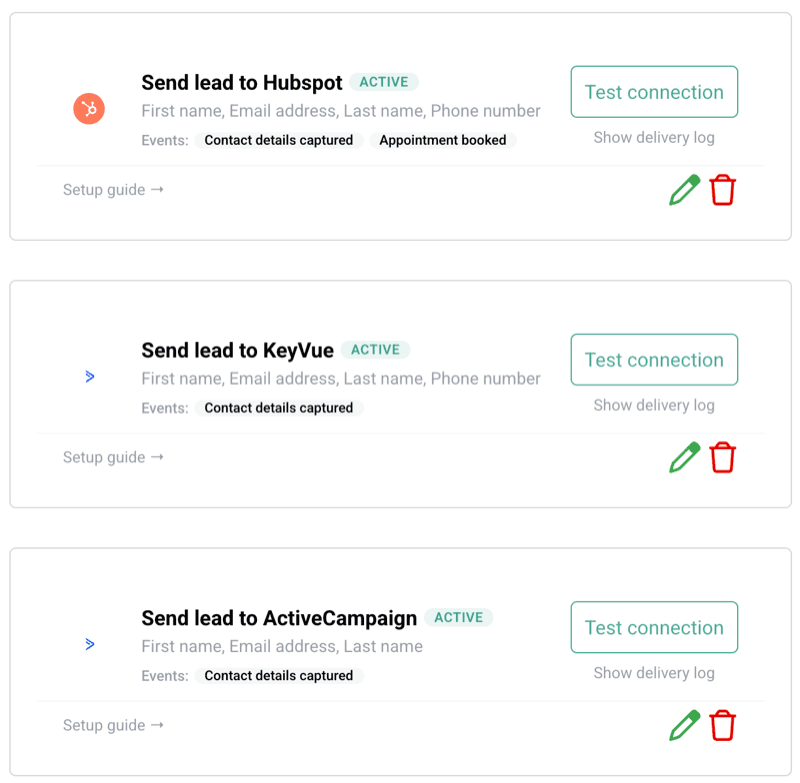
In the Integrations tab, you see all your active and inactive webhooks under Webhooks. Here you can:
- Edit a connection (change URL, name, fields, or description).
- Activate or deactivate a connection using the status toggle.
- Delete a connection if you no longer need it.
You can set up multiple webhooks per brand, each with its own goal, its own channels, and its own set of contact fields. For example, you could make one connection for viewings and a separate one for quote requests.
Examples of webhook connections
- CRM system: Automatically forward leads to your customer management system.
- Email marketing tool: Add new contacts to a mailing list.
- Internal platform: Forward viewing requests or quote requests to the right team.
- Helpdesk: Create support tickets based on conversations with your AI Agent.
Test connection
After saving, you can test the connection directly using the 'Test connection' button on the integration card. A test contact is sent and you immediately see whether the connection works (green) or there's an error (red).
Event triggers
Choose when the integration should fire:
- Contact details captured: when the AI collects contact information during a chat (most common).
- Appointment booked: when a visitor books an appointment through the agent.
- Goal completed: when a visitor reaches a defined goal (e.g., 'qualified lead' or 'demo requested').
You can select multiple events. Each event creates a separate entry in your CRM.
Include chat transcript
Optionally, you can include a summary of the chat conversation with the contact data. This gives your sales team context about what the visitor was interested in.
Note: enabling transcript sharing means the visitor's chat messages are shared with the external platform. Make sure your privacy policy allows this.
Delivery log and retries
Every dispatch attempt is recorded in the delivery log. For temporary errors, Heyloha retries the dispatch up to 4 times (1 inline attempt + 3 async retries with exponential backoff). This means a brief CRM outage won't result in lost leads.
Frequently asked questions
Can I test the webhook?
Yes. Save the connection and then start a test conversation with your AI Agent and provide the required details. Check in the receiving system whether the details were received correctly.
What if the webhook isn't working?
Check that the webhook URL is correct and that the connection is set to 'Active'. Also check in the receiving system that nothing is blocking it there, such as an incorrect API key or a closed endpoint.
Which systems are supported?
The webhook connection works with any system that can receive an HTTP POST request with form data. This includes CRM systems, marketing tools, internal applications, and more.
How many connections can I set up?
There is no limit. You can set up multiple webhooks per brand, each with its own goal and its own contact fields.
Set up HubSpot integrationSet up ActiveCampaign integrationSet up webhook with KeyVue